ServiceNow FAQs
ServiceNow Frequently Asked Questions
Thank you for downloading the ReturnCenter App for ServiceNow. ReturnCenter is a reverse logistics platform created by Onepak. This page will answer the most commonly asked questions.
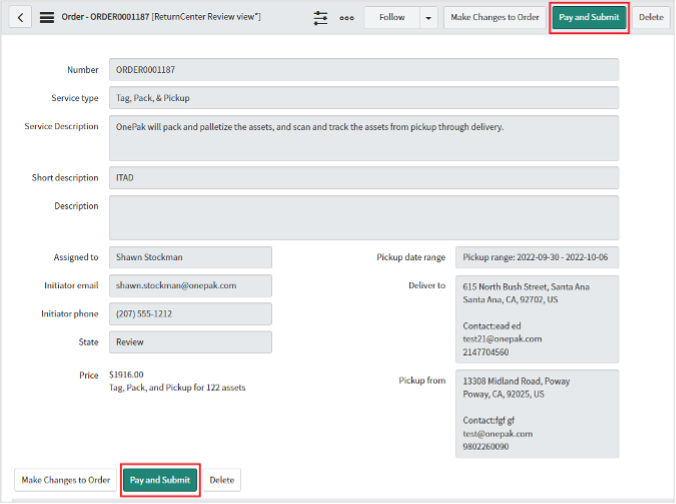
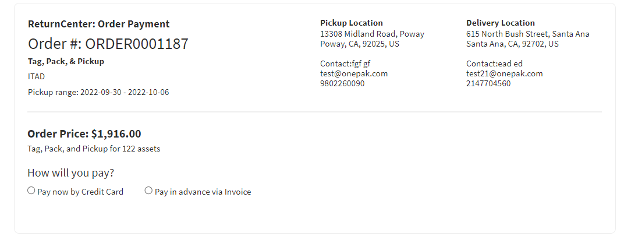
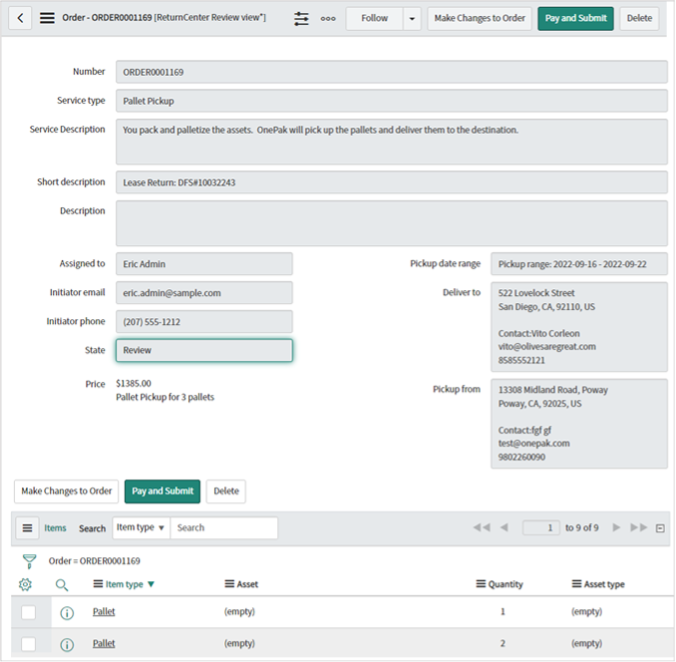
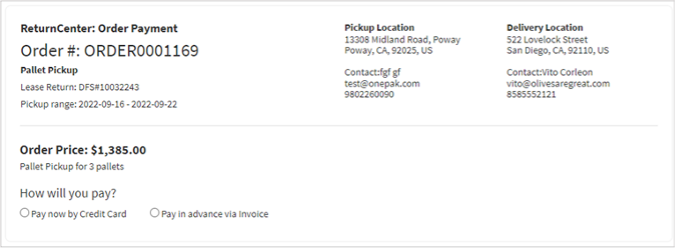
There are two ways to schedule a pickup of IT assets: Select Assets and then select a Service Type In the Filter Navigator in the left nav, type “hardware” Then click Hardware Assets below: Select the Assets to ship in the boxes on the left: Scroll to the bottom of the screen. In the box for “Actions on selected rows…” select Create ReturnCenter Order On the next screen, your selected assets will display at the bottom. Select your preferred Service Option Click Start Order On the following screen complete the fields for Pickup From, Deliver To, and the Earliest pickup date. Click Review Order The next screen will show you a price for this service and all related details. Click Pay & Submit to continue: If you do not have an account with Onepak for billing, choose your payment option to place the order: The pickup will be scheduled once payment is received. Select a Service Type and then add Items/Assets On the next screen select or enter the information required for Assigned To, Initiator Email, Initiator Phone, and a Short Description if desired. Then select locations for Pickup From and Deliver To: If you need to enter a new location for either Pickup From or Deliver To, click on the search icon, then click New: Enter the Earliest Pickup Date (must be at least 4 business days from today): Before adding Items/Assets, save your work by right clicking on the upper gray menu bar and click Save: Alternatively, you can click Update on the top or bottom menu bar to save your order. That will take you to the Pending Orders screen, and the order you were working on will be the first order at the top of the screen. Now it’s time to add Items/Assets to your order. On bottom of the order screen, click New: For Pallet Pickups, you must add Pallets and optionally, you can add Assets in ServiceNow. For Pallets, enter quantity of each pallet with similar dimensions and weight, then click Update To add Assets in ServiceNow, first click Unlock Assets: Then click on the Search icon and select specific assets by clicking on their Asset Tag. Then click Update: If you are ordering either Pack & Pickup or Tag, Pack & Pickup services, your options for adding assets to your order will be slightly different. You can add Assets in ServiceNow or Assets not in ServiceNow: For Assets in ServiceNow, follow the steps above as shown for Pallet Pickup. For Assets not in ServiceNow, you will need to: You can click in the Asset Type box and select from Recent Selections You can also start typing the asset type of choice and it will auto-populate. If the asset type you need doesn’t appear, click the Search button for a complete list: Each time you add assets, you will be returned to your order, which displays selected assets at the bottom of the Order Details screen: When finished adding assets, click Review Order on the Order Details screen: The next screen will show you a price for this service and all related details. Click Pay & Submit to continue: If you do not have an account with Onepak for billing, choose your payment option to place the order: The pickup will be scheduled once payment is received.
Option 1


Option 2
On the ReturnCenter app left side menu, click Create New.
Select the Service Type for your pickup.
Click Start Order: 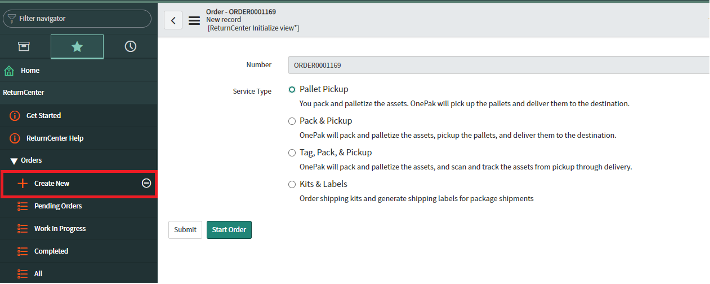


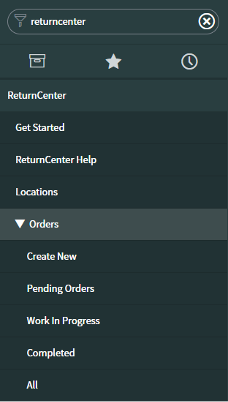
Shipments can be categorized into one of three stages. These stages can be found on the right-side menu under Orders:
Pending orders: Orders that have not been submitted for fulfillment. As you gather information about assets or locations, orders will remain in the Pending stage until they are ready to be placed.
Work in Progress: Orders that have been submitted but have not delivered to their destination.
Completed: Orders that have delivered to their destination. 
ReturnCenter offers four types of services:
- Pallet Pickup
- Pack & Pickup
- Tag, Pack & Pickup
- Kits & Labels
On the ReturnCenter app left navigation, click Create New.
Select the Service Type for your pickup.
Click Start Order: 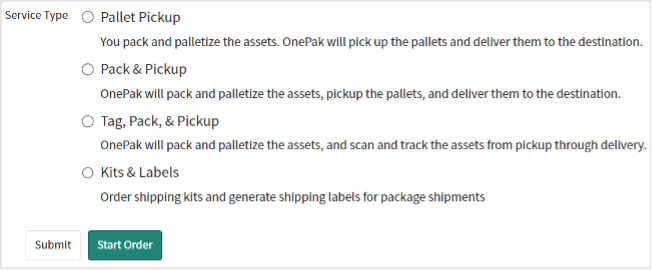
You can create just a return shipping label or send a shipping kit with a return shipping label.
To do either, on the right-side menu click Create New, then choose Kits & Labels.
Click Start Order 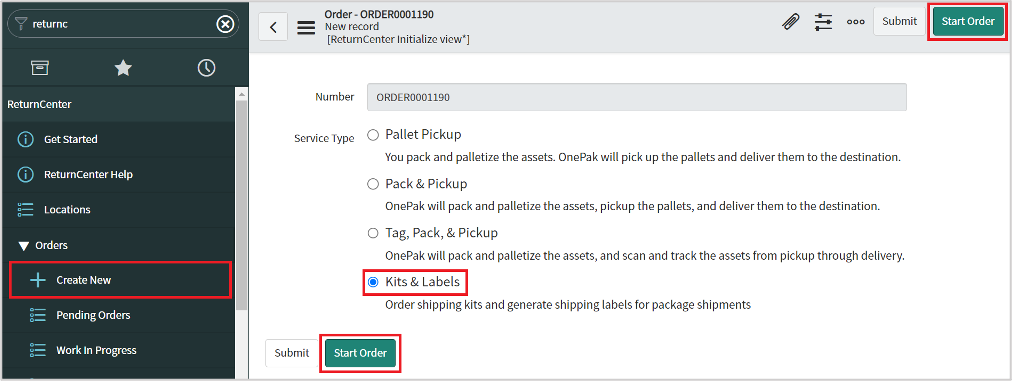
The only two required fields are Outbound Destination (where we will send the shipping kit and where the outbound package will originate from) and Return Destination (where the return shipping label is addressed). By clicking in those fields, recently used locations will appear.
Make sure you update the Assigned to field and note optional Short Description and Description fields to explain the ticket # or reason for your shipment. 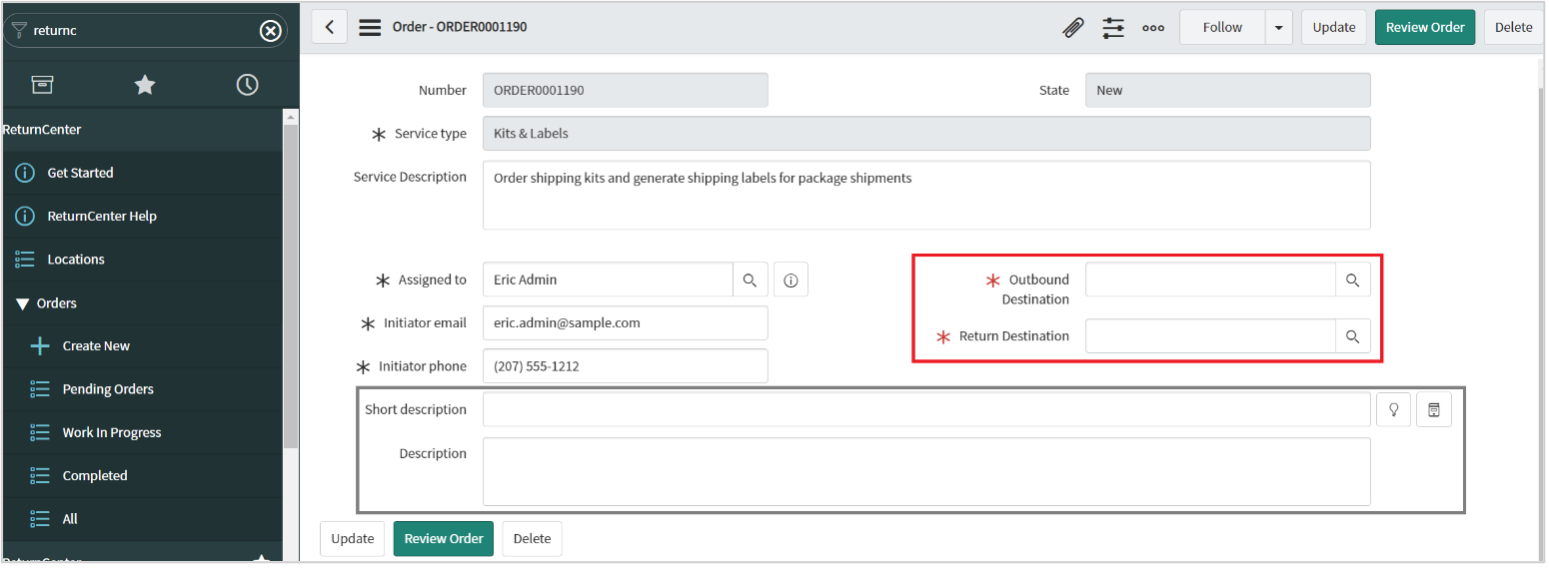
Once you have the locations and descriptions, either click on Update or right click on the top banner and click Save: 
Next, add Products (either kits or labels) by clicking on New at the bottom of the screen. 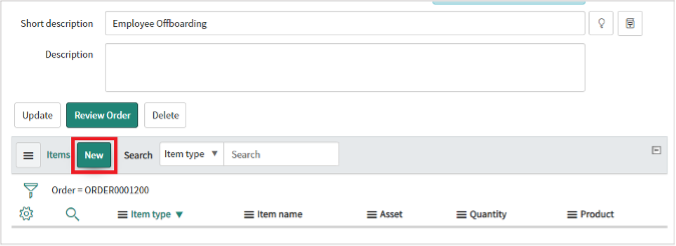
You can add Products by clicking on the Search icon and selecting the label or kit of choice: 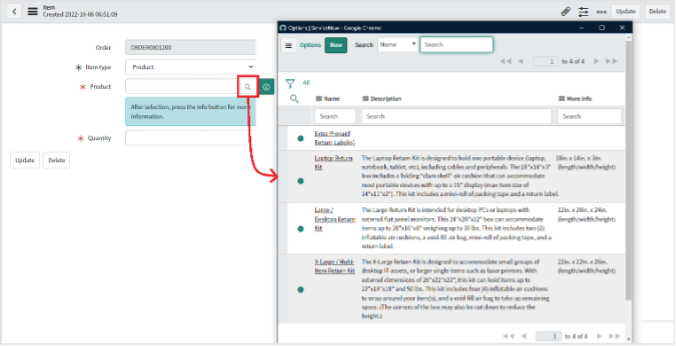
Once you select the product of choice, click Update. You can add additional products the same way. 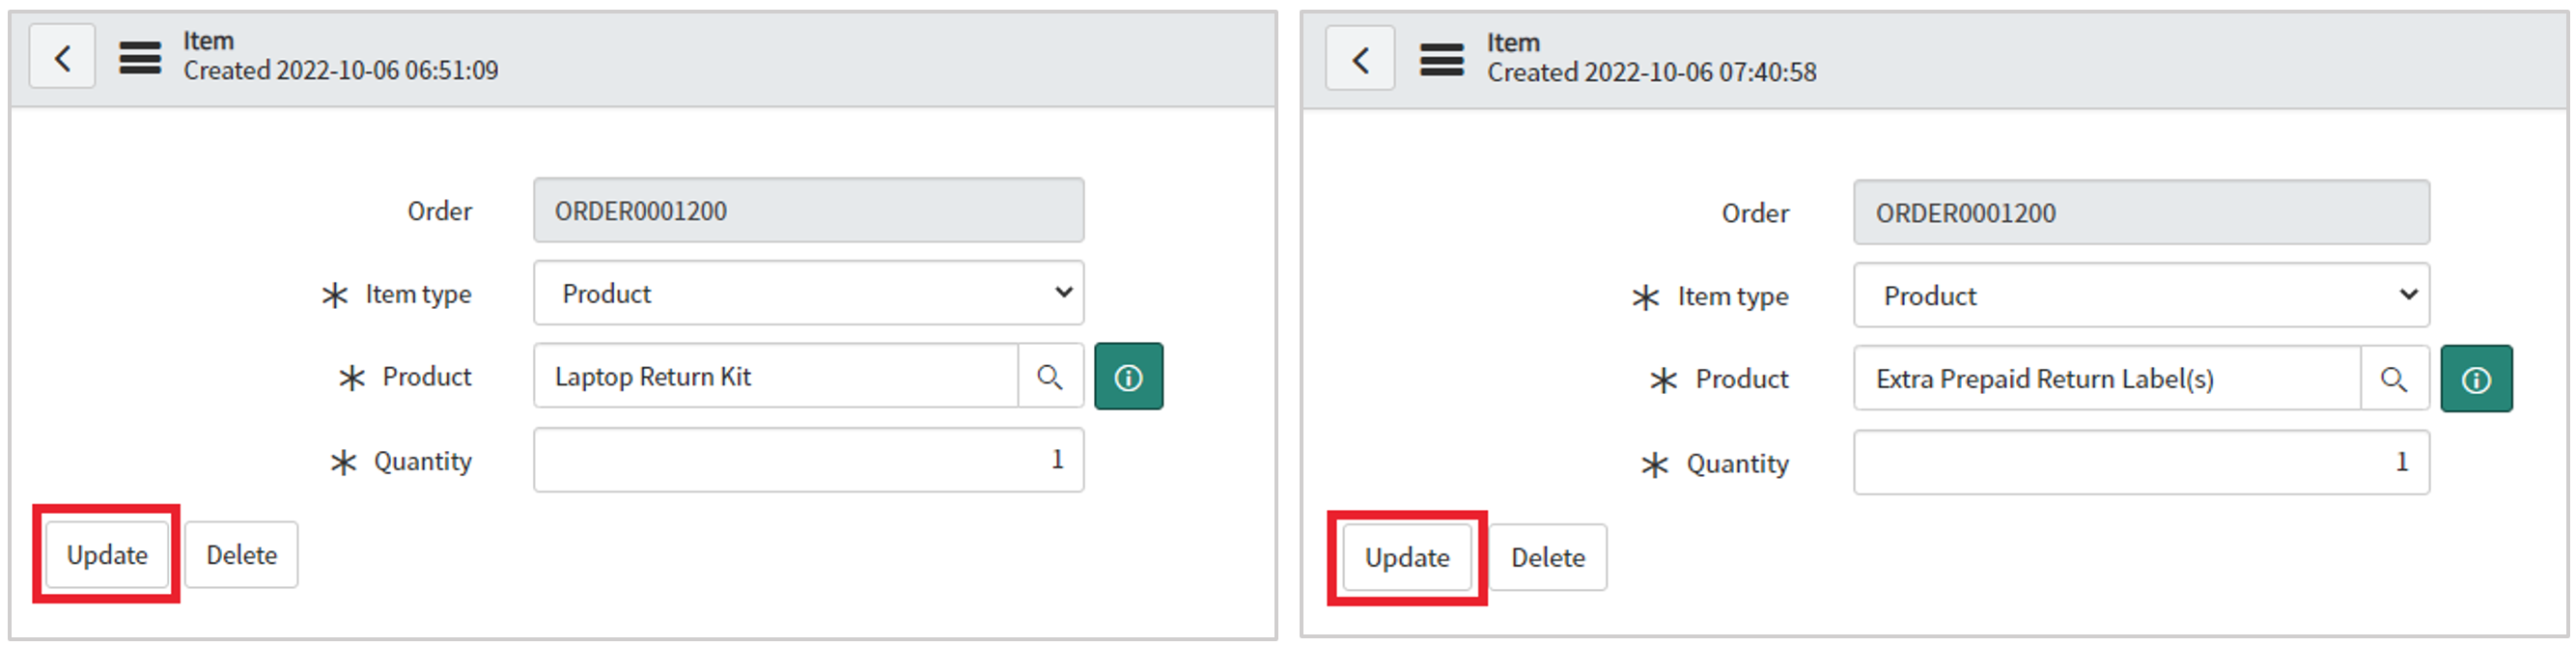
The selected Products show at the bottom of the order screen: 
You can also select a specific asset to be returned by selecting Assets in ServiceNow on that same screen.
First, Unlock Assets: 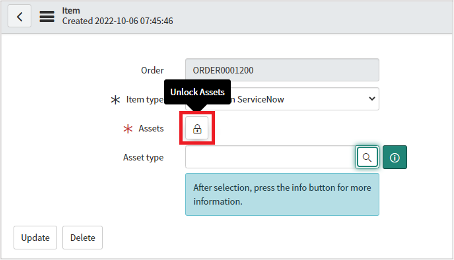
Click the Search icon and select the specific asset to be returned from the list, then click Update. 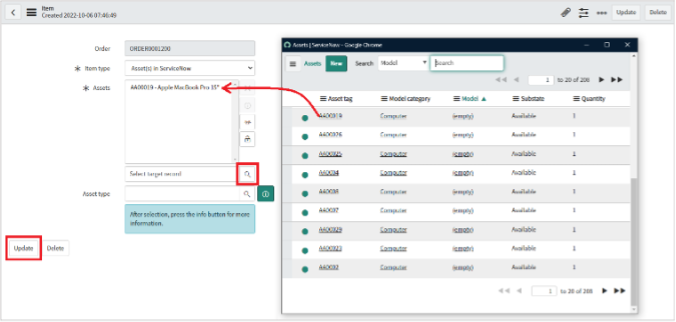
The Asset and Products will appear at the bottom of your order screen. Click Review Order to continue: 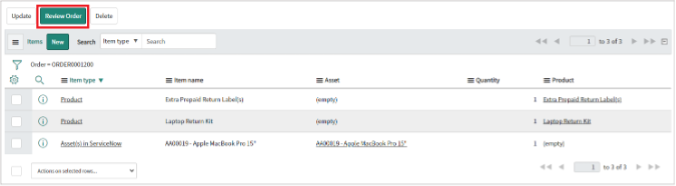
First, an overview of how Locations work with the ReturnCenter app.
For all shipments you will be selecting a Location for shipping from or to.
For Kits & Labels, the required fields are Outbound Destination (where the empty shipping kit will be sent) and Return Destination (where the return shipping label is addressed).
For all other service types you will select/add addresses for Pickup From and Deliver To.
All addresses to be used in the ReturnCenter app will be validated and corrected to ensure proper delivery. Because the app will NOT alter your company’s Locations data, the app keeps a separate Locations table with validated addresses approved for use by parcel and other carriers.
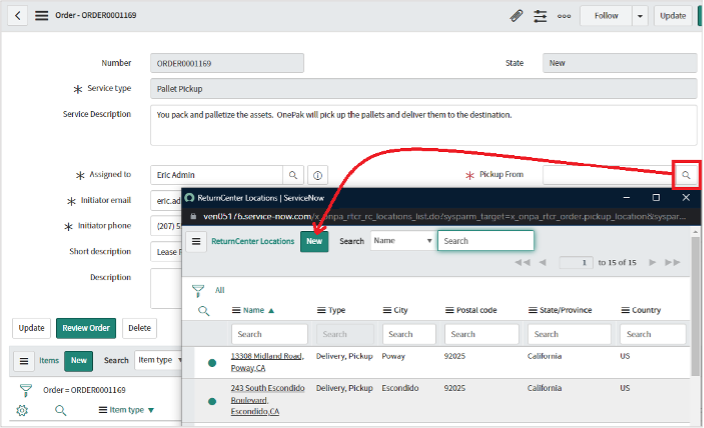
When you select addresses for Locations, those shown will automatically be addresses that have already been used and validated. To access other Locations in your organization, you will need to search for them as shown below.
For a Kits & Labels order, clicking the search icon in either Outbound Destination (where the shipping kit will be sent) or Return Destination (where the return shipping label is addressed) will display Locations recently used in the ReturnCenter app: 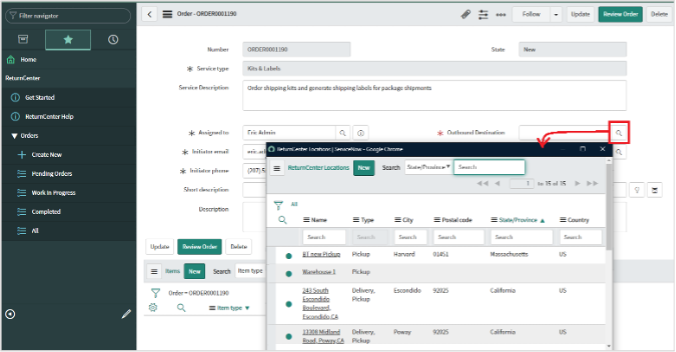
If you want to access your organization’s Locations that have not yet been used in the ReturnCenter, click New in the Search popup: 
In the ServiceNow Location field, start typing the Name or Address of the Organization’s Location you need.
That will prepopulate all related fields. Next, assign a Type to this location (for Pickup or Delivery or both): 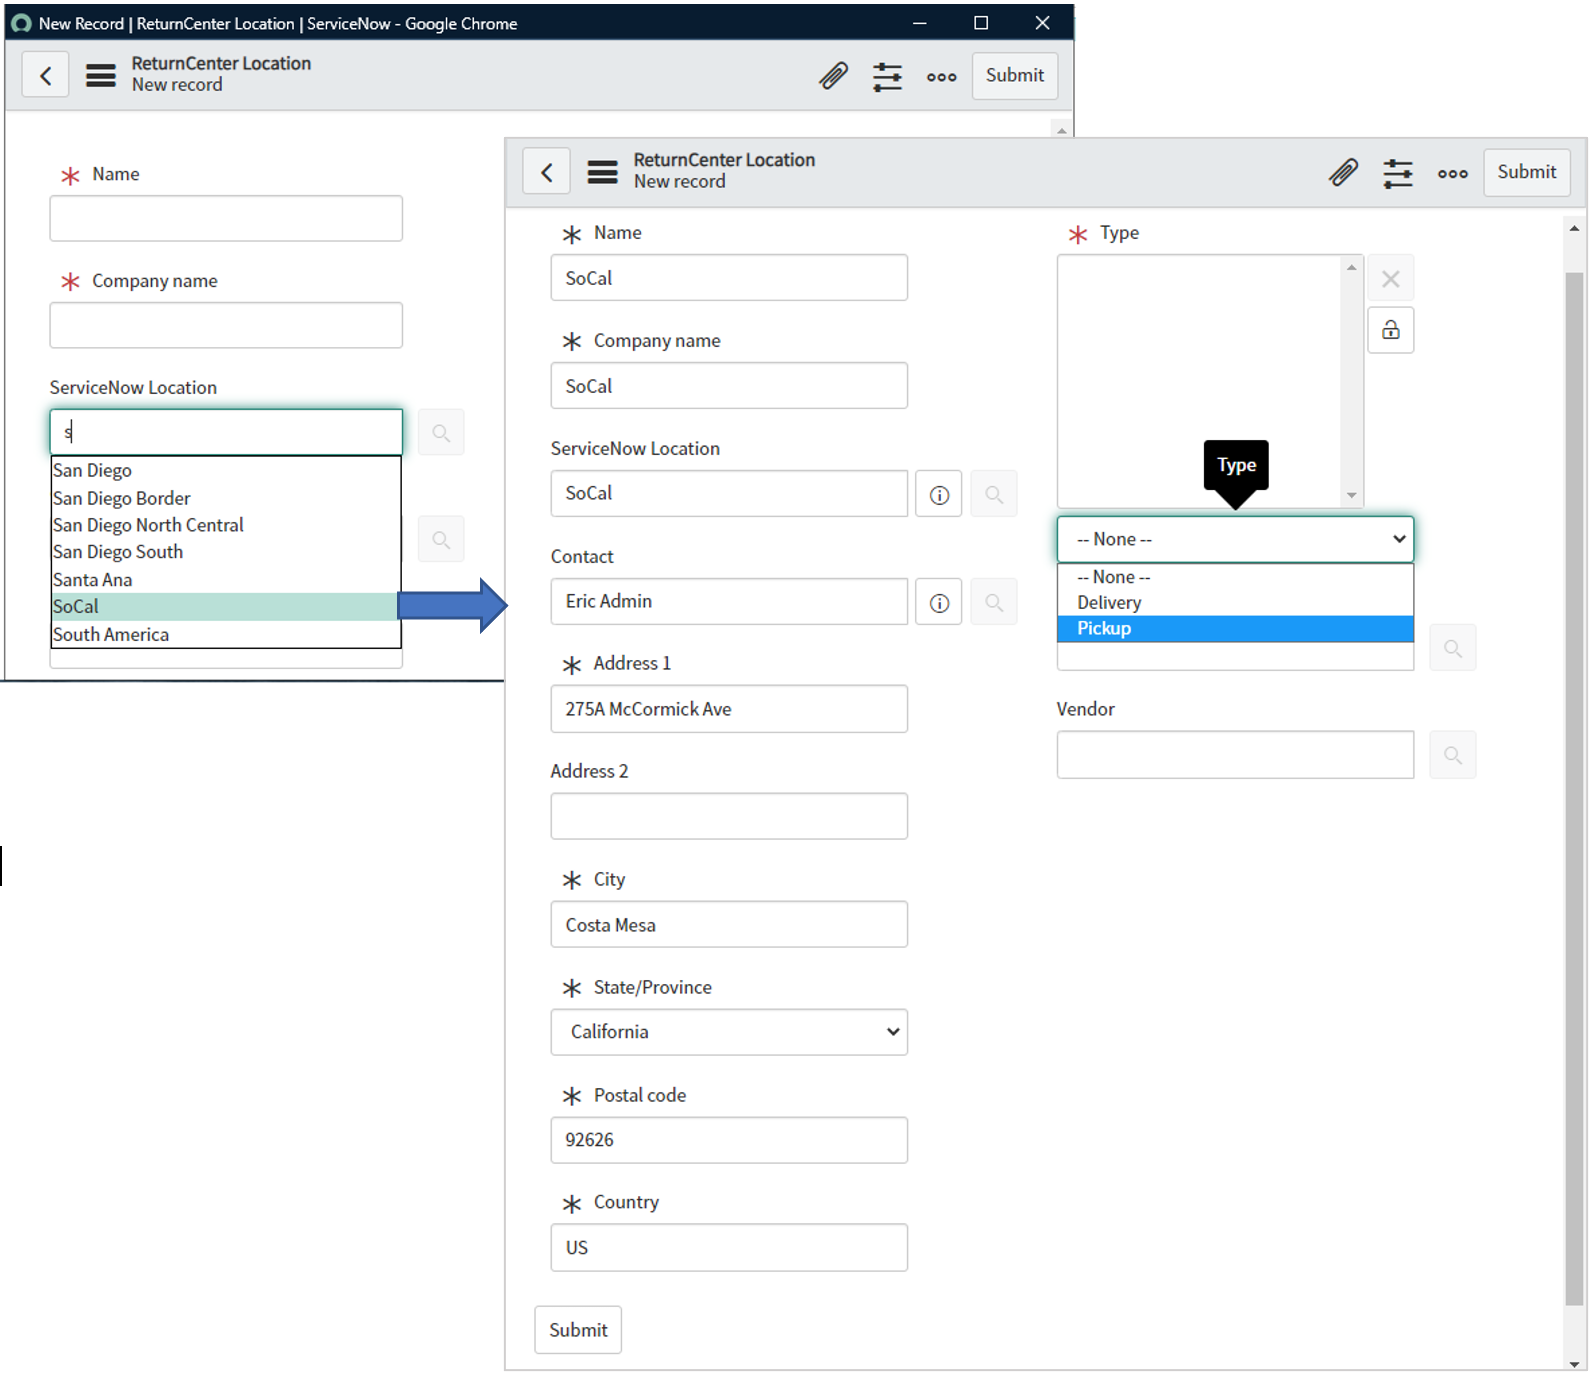
Once you click Submit, that address will appear in the desired field, and from that point on will be available as a ReturnCenter Location. 
Similarly, use the same process for other service types for either Pickup From or Deliver To locations: 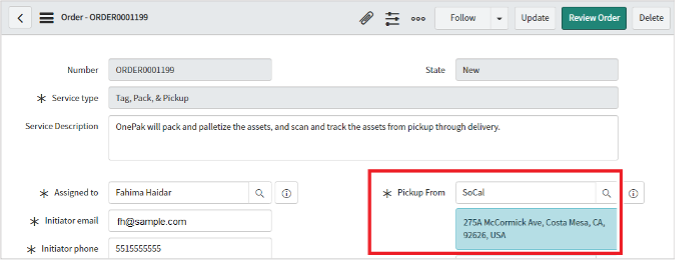
There are two ways to add assets to a pickup:
- Select Assets and then select a Service Type
- Select a Service Type and then add Items/Assets
Option 1
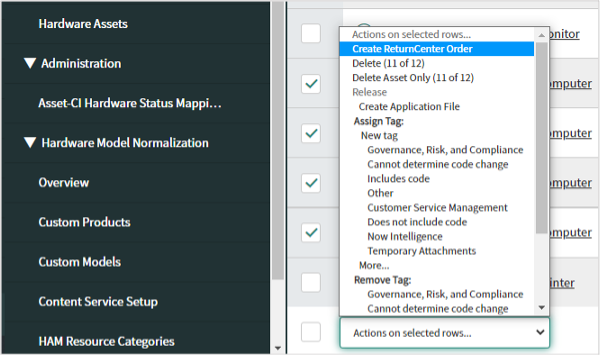
Select Assets and then select a Service Type.
In the Filter Navigator in the left side menu, type “hardware”.
Then click Hardware Assets below: 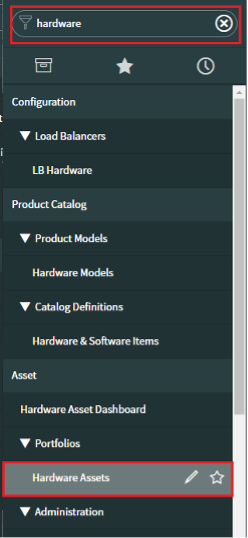
Select the Assets to ship in the boxes on the left: 
Scroll to the bottom of the screen.
In the box for “Actions on selected rows…” select Create ReturnCenter Order 
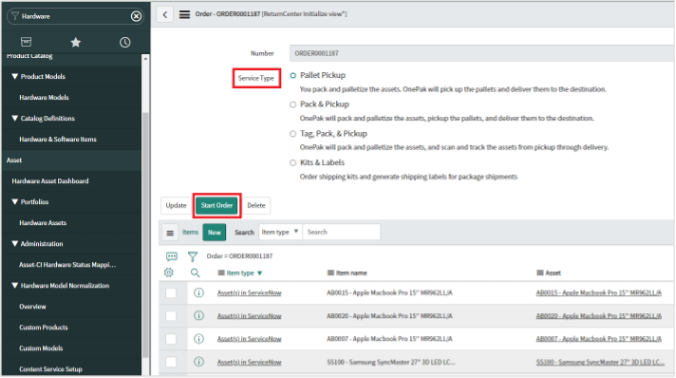
On the next screen, your selected assets will display at the bottom.
Select your preferred Service Type
Click Start Order 
Option 2
Select a Service Type and then add Items/Assets.
On the ReturnCenter app left side menu, click Create New.
Select the Service Type for your pickup.
Click Start Order: 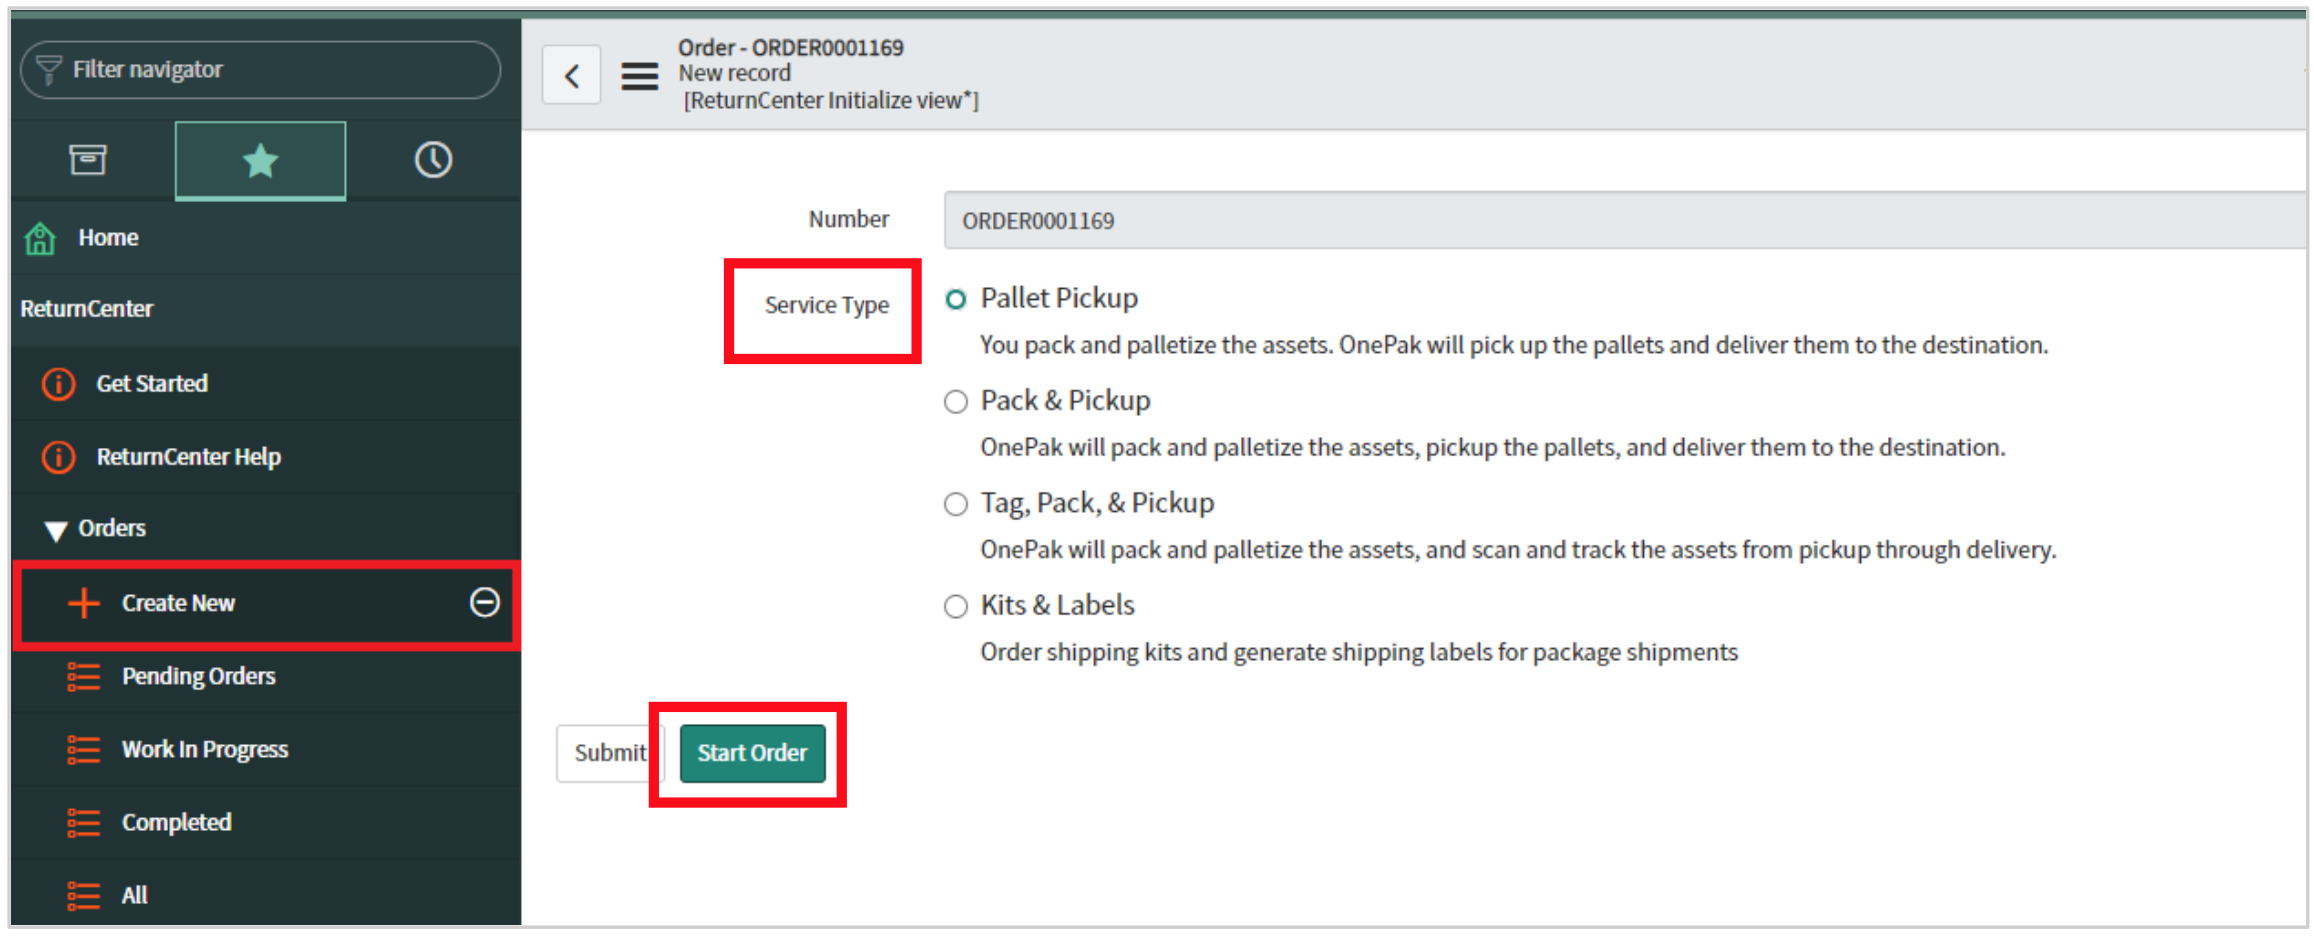
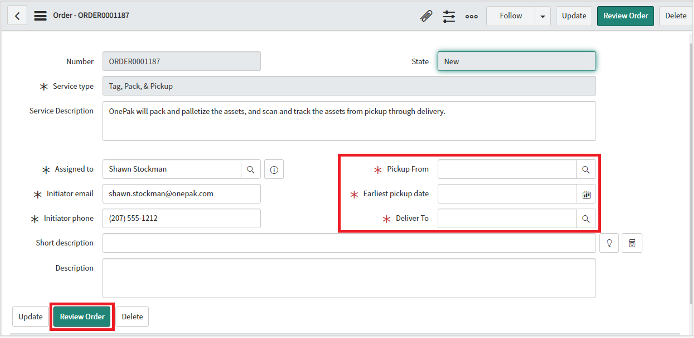
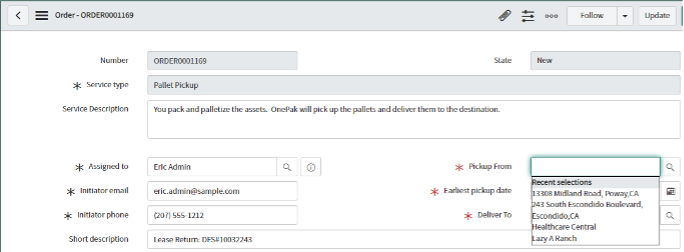
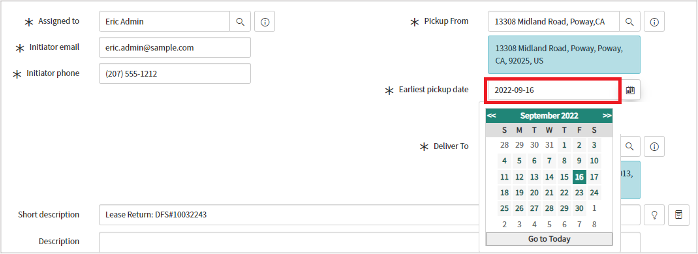
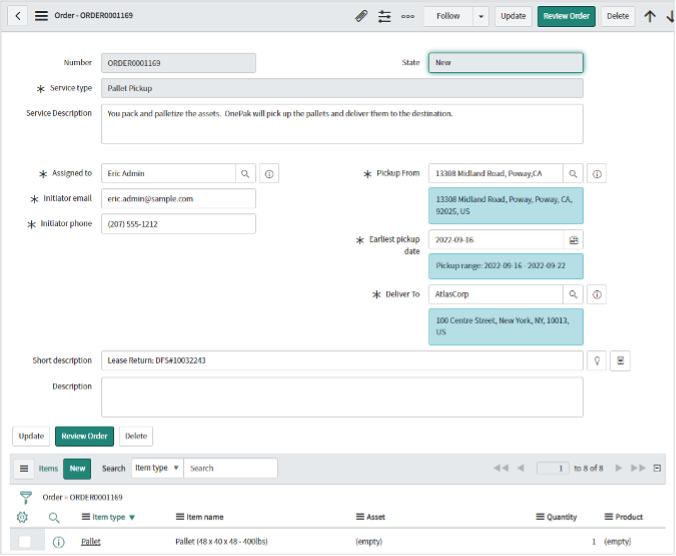
On the next screen select or enter the information required for Assigned to, Initiator email, Initiator phone, and a Short description if desired. Then select locations for Pickup From and Deliver To: 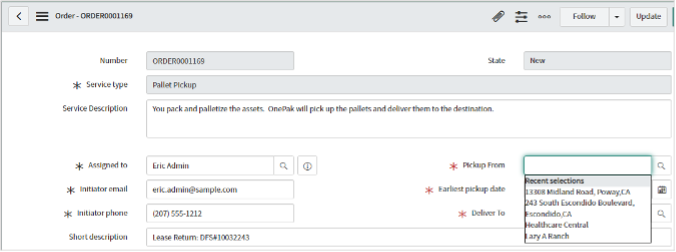
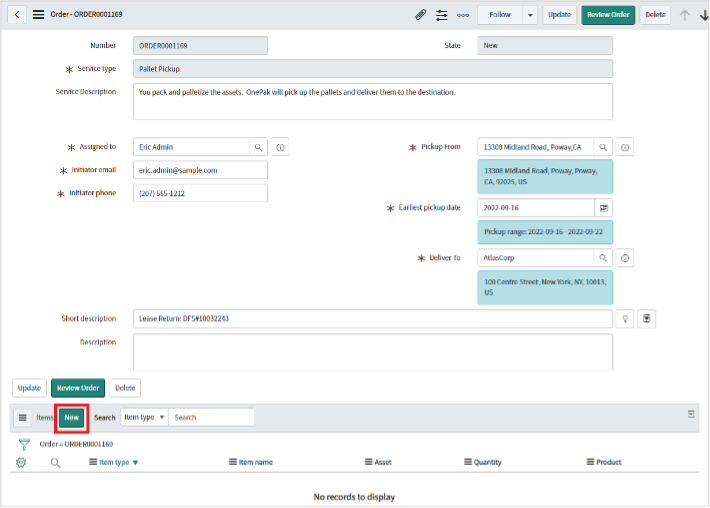
Now it’s time to add Items/Assets to your order. On the bottom of the order screen, click New: 
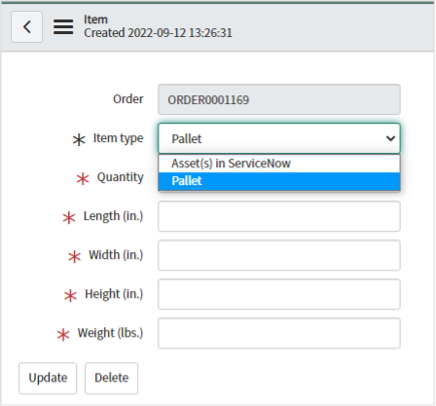
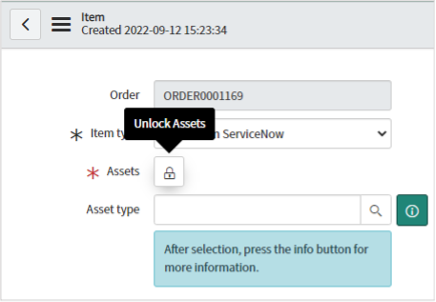
For Item Type, select Assets in ServiceNow.
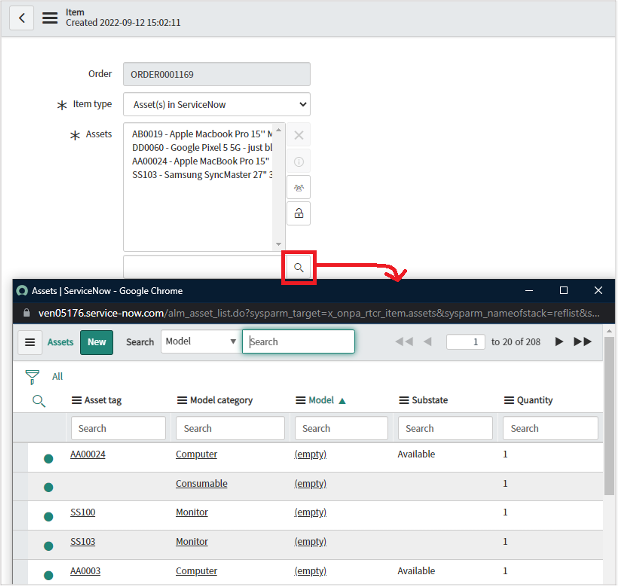
To add Assets in ServiceNow, first click Unlock Assets: 
Then click on the Search icon and select specific assets by clicking on their Asset Tag. Then click Update: 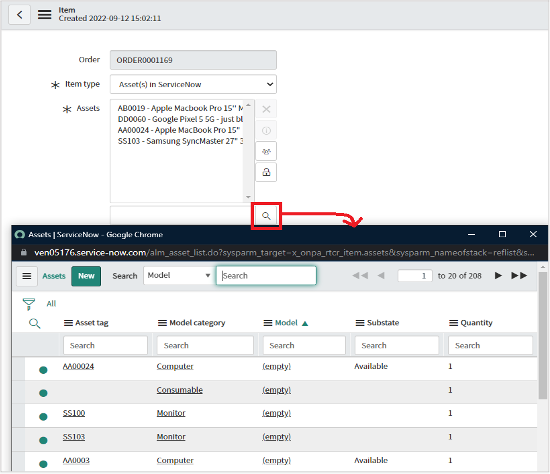
If you are ordering either Pack & Pickup or Tag, Pack & Pickup services, your options will be slightly different to add assets to your order. You can add Assets in ServiceNow or Assets not in ServiceNow: 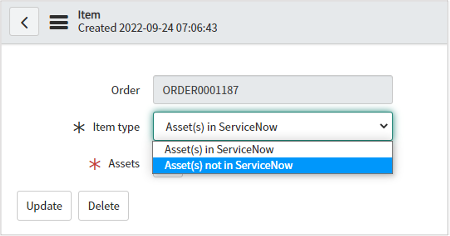
For Assets in ServiceNow, follow the steps above.
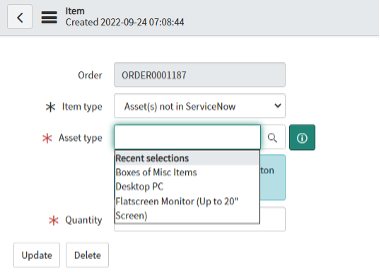
For Assets not in ServiceNow, you will need to:
Select the Asset Type you will be shipping.
Add a Quantity.
Click Update.
You can click in the Asset Type box and select from Recent Selections: 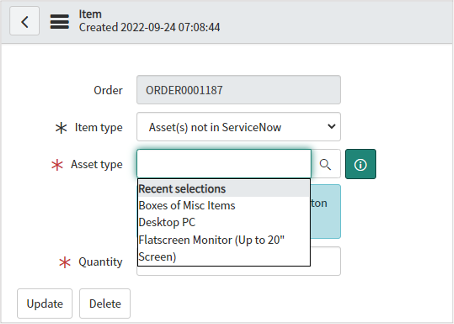
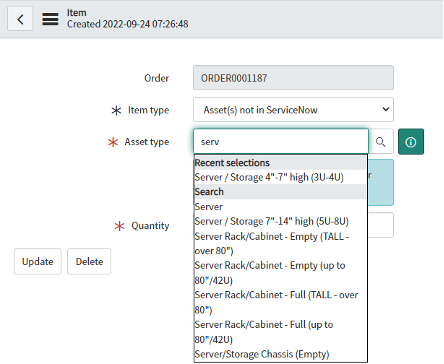
You can also start typing the asset type of choice and it will auto-populate. 
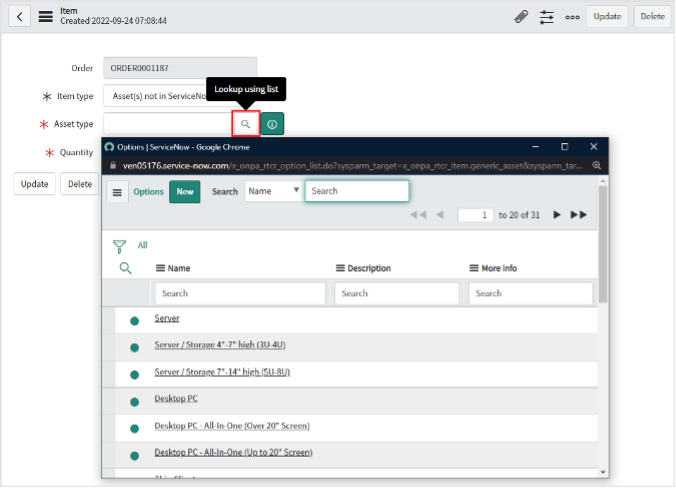
If the asset type you need doesn’t appear, click the Search button for a complete list: 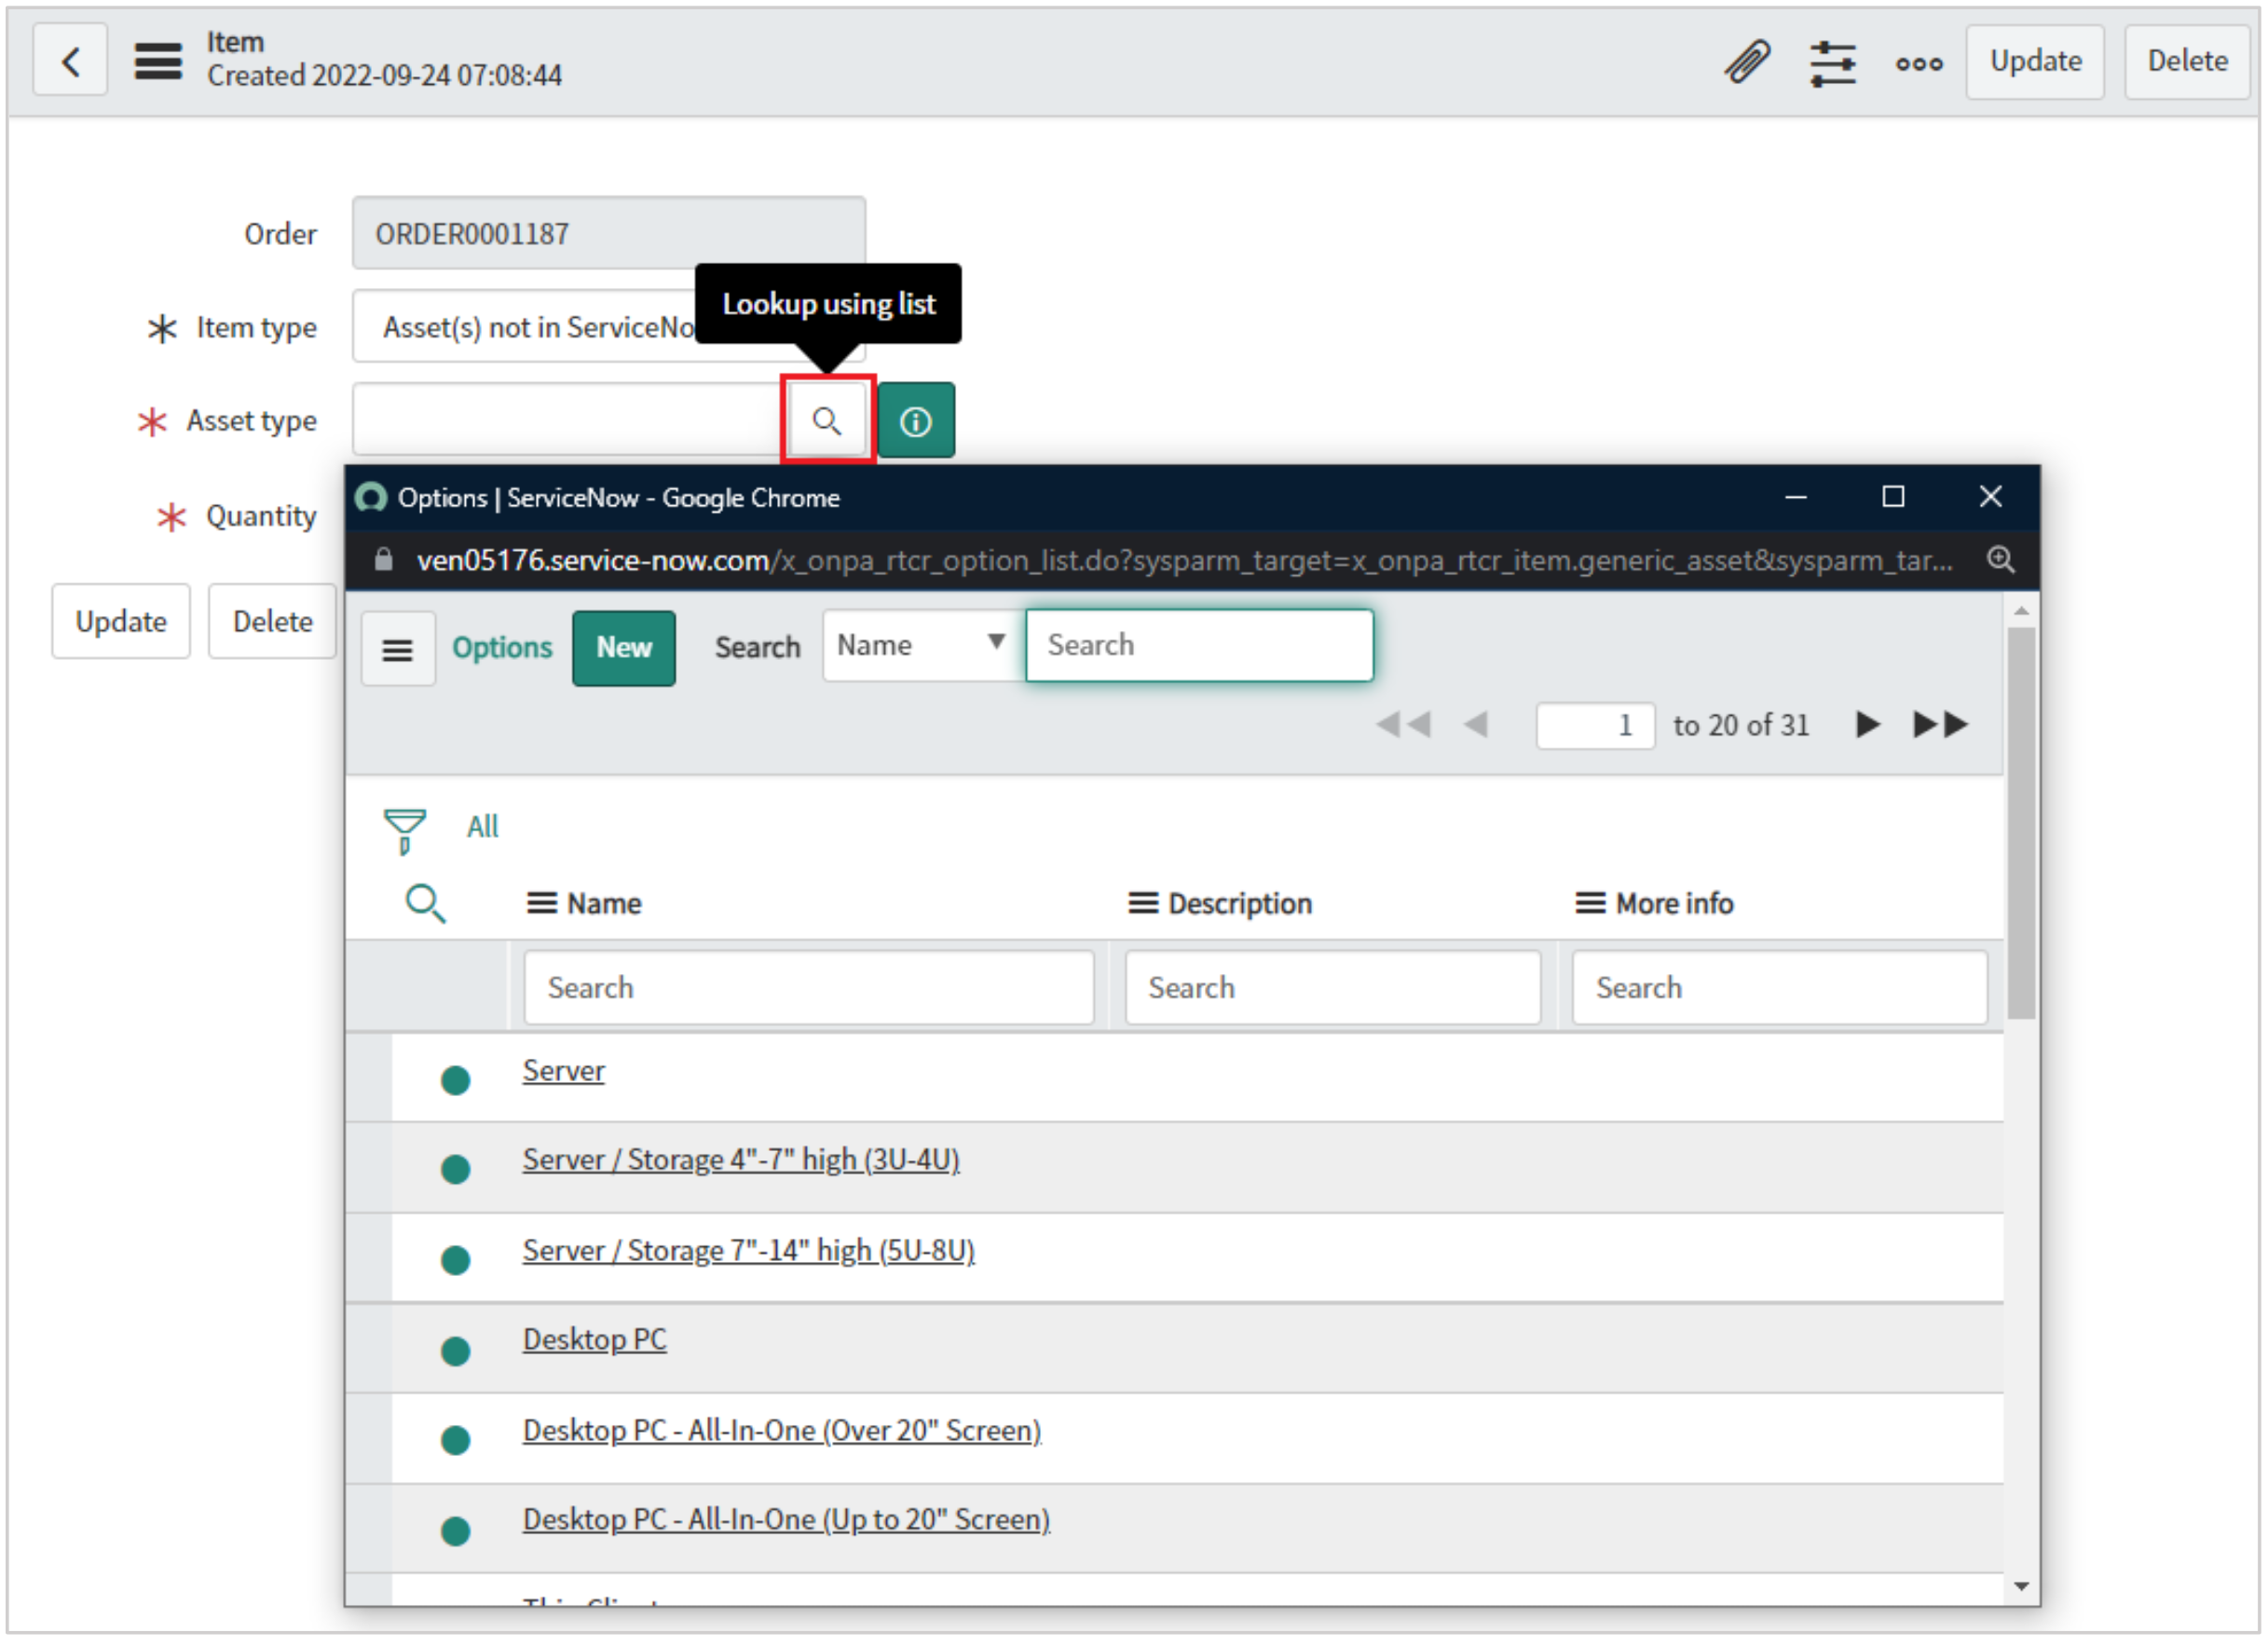
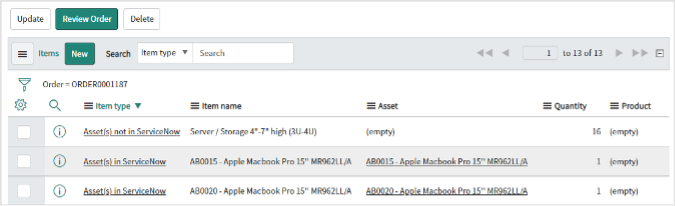
Each time you add assets, you will be returned to your order, which displays your selected assets at the bottom of the Order Details screen: 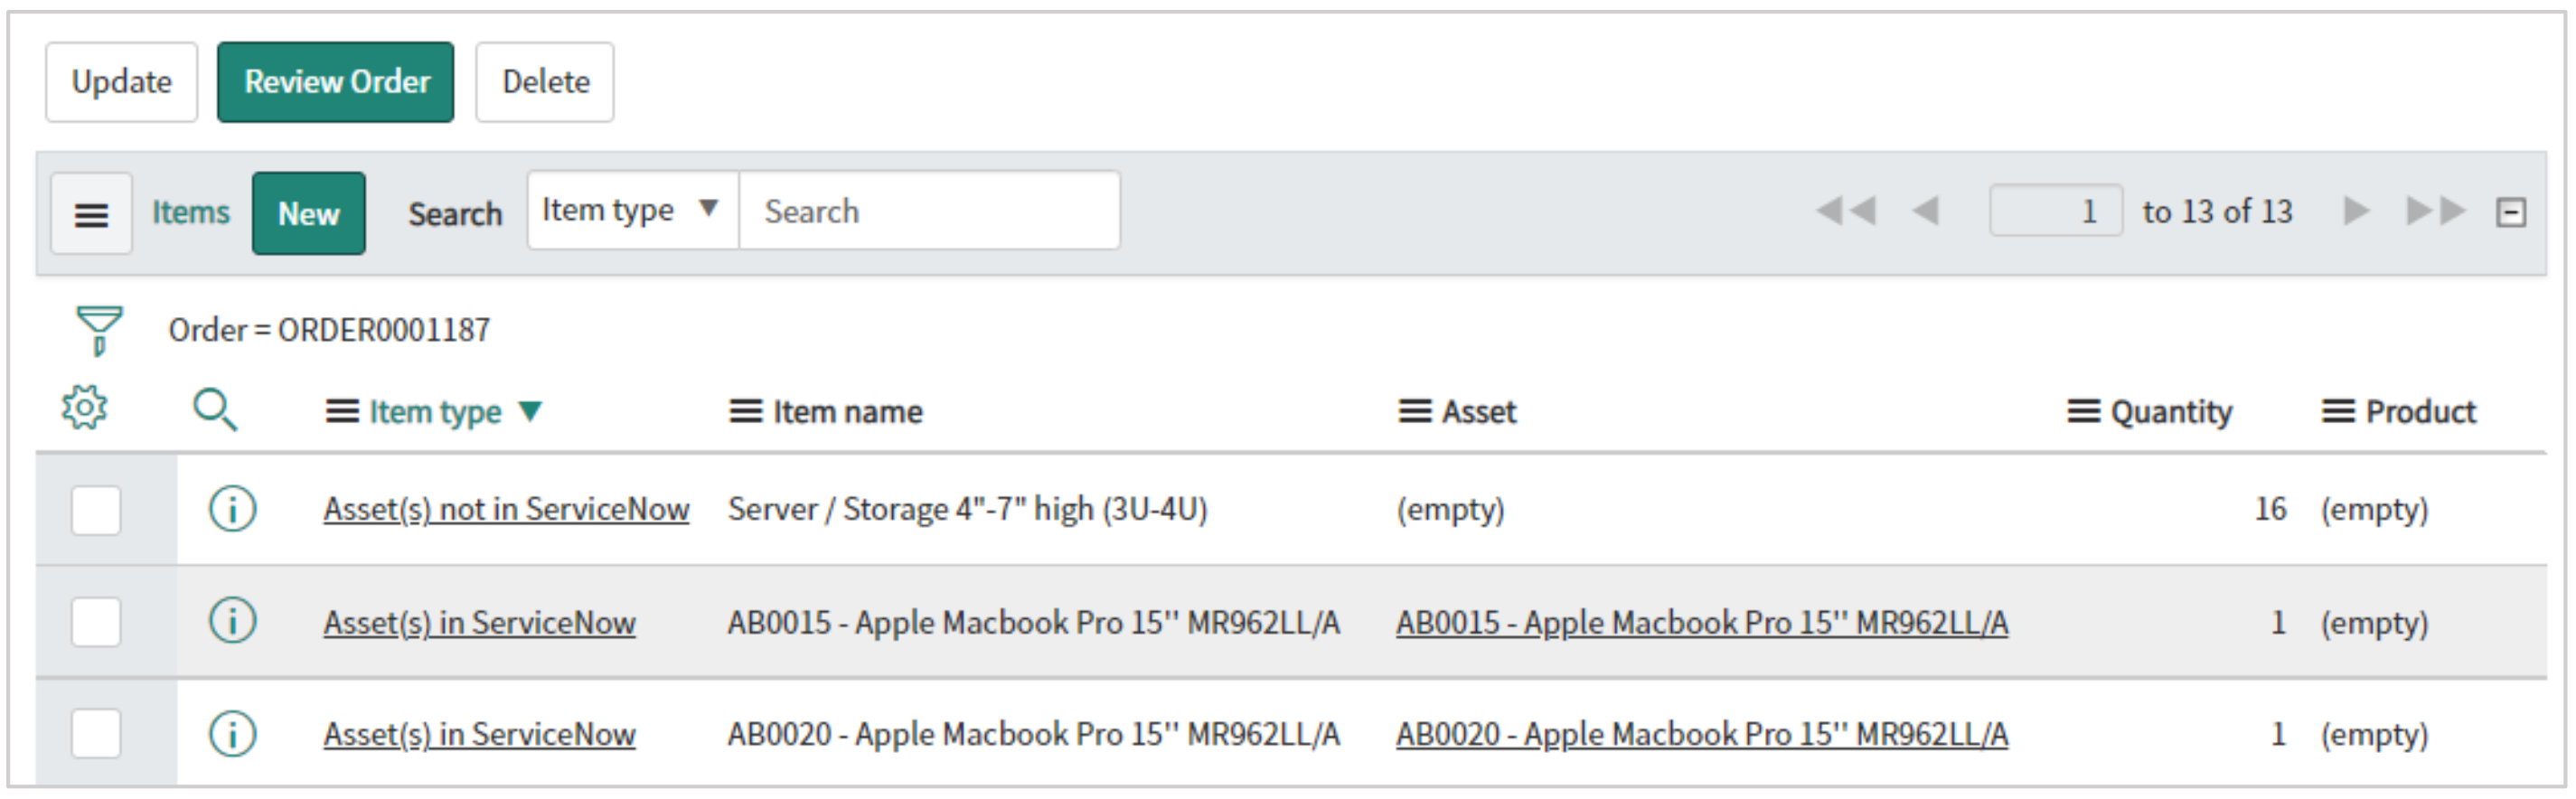
Overview
This guide can be used to assist with the preparation of your install of OnePak ReturnCenter. This document will overview both how to install the live production instance of the ReturnCenter application but also a demo/test instance as well.
If you are installing ReturnCenter in a production instance of Servicenow, follow the instructions in steps 1 and 2. If you install into a production instance, please be sure to “Create an Account” so that your company will be properly set up in Onepak’s system for taking orders.
If you are installing ReturnCenter in a demo/test instance of Servicenow, follow steps 1 and 3. If you install into a test instance, please be sure to not “Create an Account” as this will cause issues and may result in your company being billed for test transactions. Please, be sure to read all instructions before proceeding.
NOTE: The ReturnCenter app was designed to operate seamlessly within the Service Portal, which has a web address structure like www.xxxxxxxx.service-now.com/sp. If you have customized the out-of-the-box (OOB) Service Portal URL configuration, we recommend creating a Service Portal configured to support the ‘/sp/’ structure before installing the app.
For assistance, please reach out to servicenow@onepak.com.
-
General Install Instructions
- Sign into the desired instance of ServiceNow.
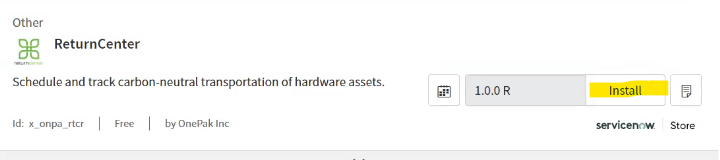
- Go to the ServiceNow App Store and search ReturnCenter.
- Click Request Application.
- Await Onepak approval (usually within one business day). For updates, please reach out to customersupport@returncenter.com
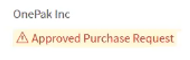
- Once approved, ReturnCenter will be listed as “Approved” with the below label in the App Store.
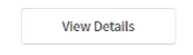
- After this approval, and when you are ready to install, click View Details.
- This will bring you to the ReturnCenter Install Page. Click Get in the top right.

- You will then be prompted to provide an email and password. Use your ServiceNow (HI) credentials
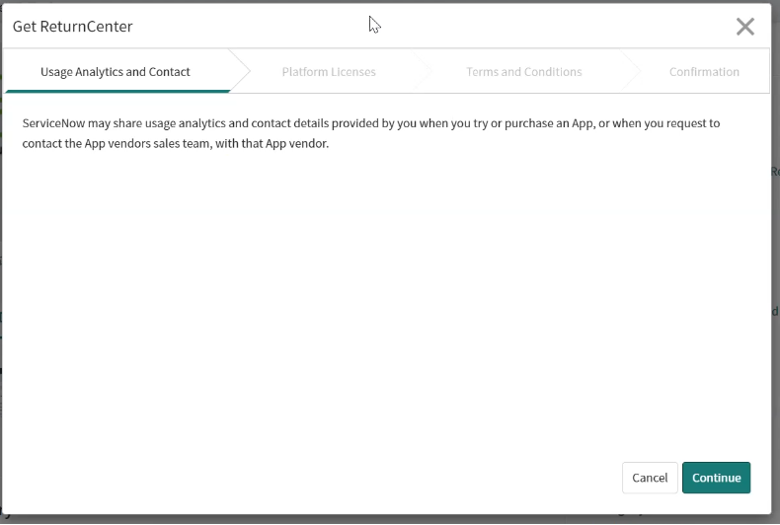
- A popup window with 4 tabs will then open. Click Continue to progress through the four tabs (Usage Analytics and Contact, Platform Licenses, Terms and Conditions, and Confirmation). On the Terms and Conditions tab, you need to confirm you have read and agree to the terms. On the last tab labeled Confirmation, click Install in the bottom right.
- A loading circle will pop up. Wait until the page is loaded. This could take a minute or two.
- Once it is loaded, click Install
- NOTE: At this point of the installation, you need to choose between installing with or without demo data and creating an account:If you are in a demo/test instance and would like to test the ReturnCenter app:
- You will not be connected to Onepak for order fulfillment and your application will leverage demo data for you to test.
- Click on Load demo data
- Do NOT create an account
- Orders created are visible in your test instance of ServiceNow only
- To install the demo data in a demo/test instance, skip to section 3 of this document.
If you are in a production instance and want to start placing live orders:
- Do NOT click on load demo data
- Create an account
- To install the live production application, follow section 2 of this document.
-
Live Production Install
- An Application Installation popup window will open. Do NOT select “Load Demo Data.” Click Install in the bottom left of the popup.
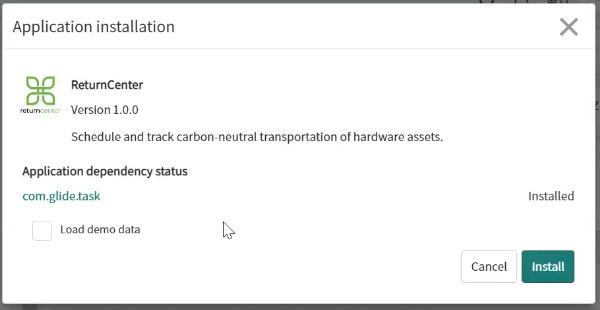
- An install bar will pop up to show the install progress. Once it is complete, click Close.
- Then refresh your browser window
- Search ReturnCenter on the left side menu search bar. You will now see ReturnCenter as an application.
- Click Get Started on the left side menu and a new window will open.
- At the bottom of the new window click Create a ReturnCenter Account. Reminder, only create an account if you are in a production instance of ServiceNow. This enables live orders to be placed.
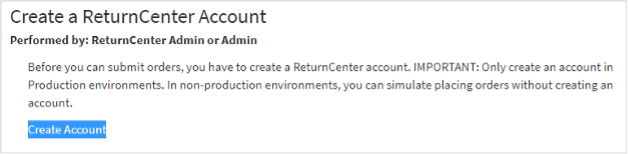
- This will bring you to the Account Registration page. Complete the fields as needed and then click Register at the bottom of the page.
- You are now fully registered with ReturnCenter and you can start making orders.
- An Application Installation popup window will open. Do NOT select “Load Demo Data.” Click Install in the bottom left of the popup.
-
Install Demo Data in a demo/test instance
- After clicking Install, an Application Installation popup window will come up.
- Select “Load Demo Data.” This will tell the system that you want to install the demo data in your test instance.
- Click Install in the bottom left of the popup.

- An install bar will pop up to show the install progress. Once it is complete, click Close.
- Then refresh your browser window
- Search ReturnCenter on the left side menu search bar. You will now see ReturnCenter as an application. Click Create New to make test transactions.

- Additional notes about the demo/test instance of the application
- If you selected “Load Demo Data” during the install process, you are not in a live
instance of ReturnCenter and not connected to the ReturnCenter APIs. - Your instance of ReturnCenter will be populated with dummy data for you to test and
play with. Default order amounts are $100.00 and are not indicative of actual pricing. - There is no location data populated in the demo data, so in order to create test orders,
you will need to add “Deliver To” and “Pickup From” locations on the locations screen or
as you create test orders. - Additional tips can be found by clicking Get Started in the left side menu.
- DO NOT “Create a ReturnCenter Account” in a test instance. This will register a live account
at Onepak and any orders submitted will be fulfilled and require payment. - To place live orders through ReturnCenter, sign in to a production instance of
ServiceNow and install the application by following sections 1 and 2 of this document.
This will have no impact on your test instance.
-
Uninstall Instructions
Please use this section if you ever need to uninstall the ReturnCenter application. This may be needed if you accidentally installed the production version and want to install the demo version or if
you ever have to reinstall the application for troubleshooting purposes.- In the left side menu, search for “Applications”, and select All Applications.
- Search “ReturnCenter”.
- Click the three dots button to the right of the application name.
- Select Uninstall.

- In the popup window, Uncheck Retain Tables and Data and click OK.
- A progress bar will pop up with percent complete.
- Click Done when it pops up.
- All apps will then refresh and you will no longer have the ReturnCenter application.
About
ReturnCenter is a reverse logistics platform created by Onepak, and the ReturnCenter app in ServiceNow is your gateway to the range of services provided by the platform. All logistics services booked through the ReturnCenter app are carbon neutral. As a reverse logistics platform company, Onepak has led the industry in sustainability solutions since 2005, offering tech-enabled tools, accountable chains of custody and an efficiency advantage to businesses across the globe. Each of our clients use Onepak to drive their sustainability or circular economy programs. For more information about carbon offset reports and other programs available for the shipments you book through the app, please contact us at servicenow@onepak.com.